10GB Ethernet with Proxmox and Ryzentosh 3700X with macos Catalina
Please read my previous post on my DIY NAS here: 1 and 2.
10 gigabit. That is 10,000 megabit.
I come from a time when fast internet meant you had ISDN. For reference, that’s 192kbps, or roughly 24KB/s.
For the past eight years I’ve had CAT-5E / CAT 6 installed through-out my house and have enjoyed LAN speeds of 1000mbps or 1gbps. At full throttle that ways in at about 125 Megabyte/s.
Now, gigabit ethernet is fine for almost everything. Unless you either transfer large files or if you use that NAS as a direct access disk on a workstation.
The latter is pretty much my use-case. I make music and the occasional video, and storing and manipulating all this over a 1gbps line is not so fun.
Yes, I do have an SSD, yes I do have spinning rust in my workstation. The problem is that they lack redundancy and extra work to backup. Everything that’s on my NAS profits from the redudancy of my ZFS pool, periodical ZFS snapshots, decent drive health monitoring (thanks, Proxmox!) and automated backups to another set of disks and the cloud.
When I found out that there’s a really cheap option to add 10 gigabit networking between my Ryzentosh and Proxmox NAS - I went for it.
Total cost of this project:
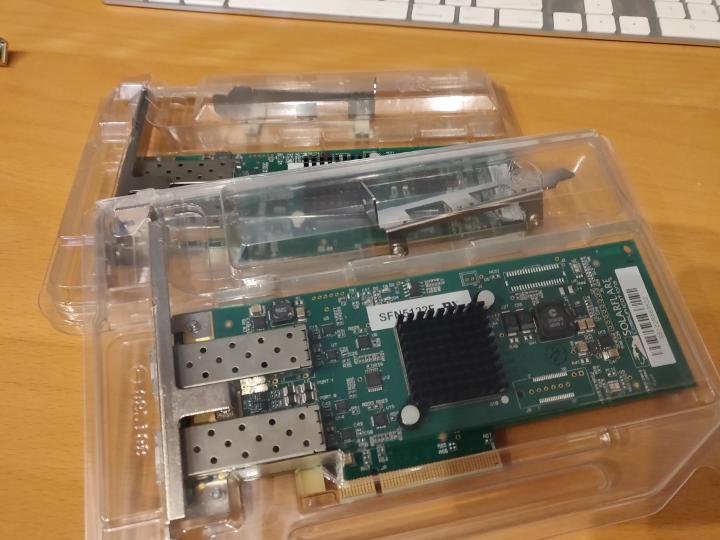
- $40 - 2x Solarflare SFN5122F shipped. yes, that is two network cards, with two 10 gbit ports each. For $40. Including shipping.
- $20 - A SFP+ 10gbe copper cable (1 meter).
That. Is. It.
Proxmox setup
Okay, let’s start with the easy part. Proxmox. Or Debian Linux, more specifically. It’s just plug and play. ;-) Plug the card in any PCIe x8 slot and you’re good to go.

Next, you only need to configure your NIC. It’s a good idea to create a Linux Bridge in Proxmox. This will allow you to assign this interface to containers as well,
as I’ll come back to in a minute.
You can pick any IP address you like in a private range. You don’t need a gateway - well I didn’t - because I have a point-to-point connection. Litteraly a cable between the two systems.
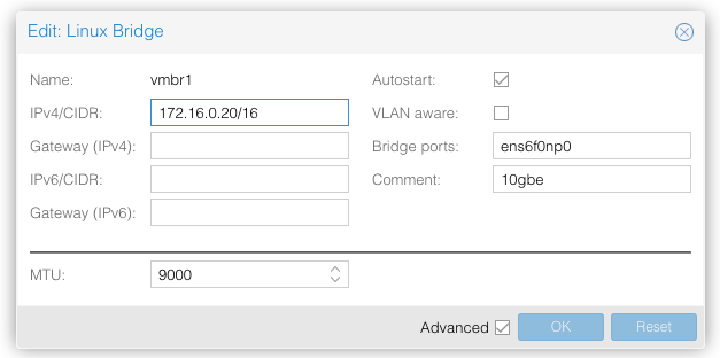
Be sure to enable advanced options and set MTU to 9000 - jumbo frames. This will enable you to reach those juicy 10gbps speeds later on.
Hackintosh / Open Core setup
Download Solarflare 10GbE Mac Drivers.zip
Solarflare is no longer supporting macos and has since removed these drivers from their website. The drivers they made still work in Catalina.
This is where things get a bit more tricky. I can’t vouch for this working on a real Mac, but then again, adding (non-Apple) hardware is not what you’re supposed to do with these anyway, right? ;-)
Any modern hackintosh should run Open Core these days. Open Core is awesome. It takes a bit of work to setup, but your mac will continue working after that, updates and everything. So, the next bit assumes you’re familiar with Open Core.
- Download the archive above. It contains a signed installer for macos 10.9. Mount that disk image. Don’t bother using the installer.
- Use “View contents” on the installer and find
Archive.pax. Unpack that and find your kext and someApplication Supportstuff. - Drag folder under
Application Supportto/Library/Application Supportif you need it. - Mount your
EFIpartition and drop the kext in the folder with your other kexts. - Then update your
config.plistto load the kext - you can copy paste any other entry and change the filename. But again, if you’re already running Open Core, you probably know the drill. - Reboot
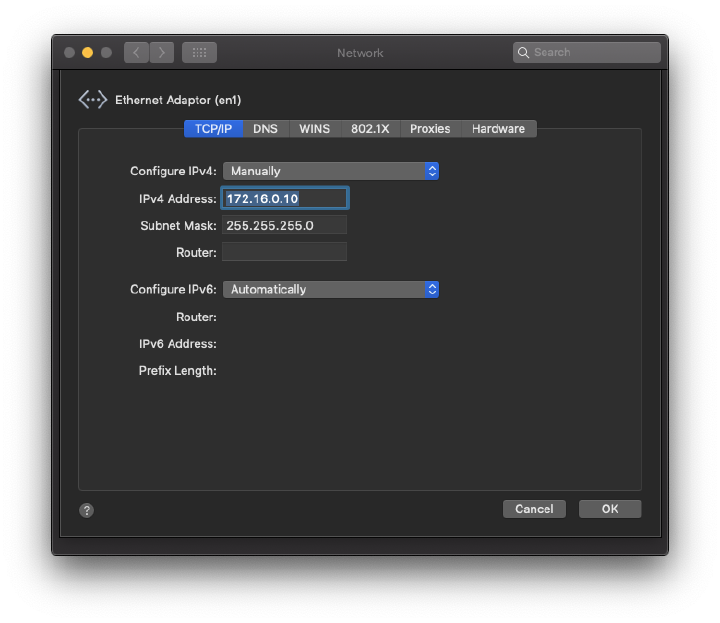
Next up, all you need to do is configure your NIC under Network Preferences. Again, pick an IP address in the same subnet as your server.
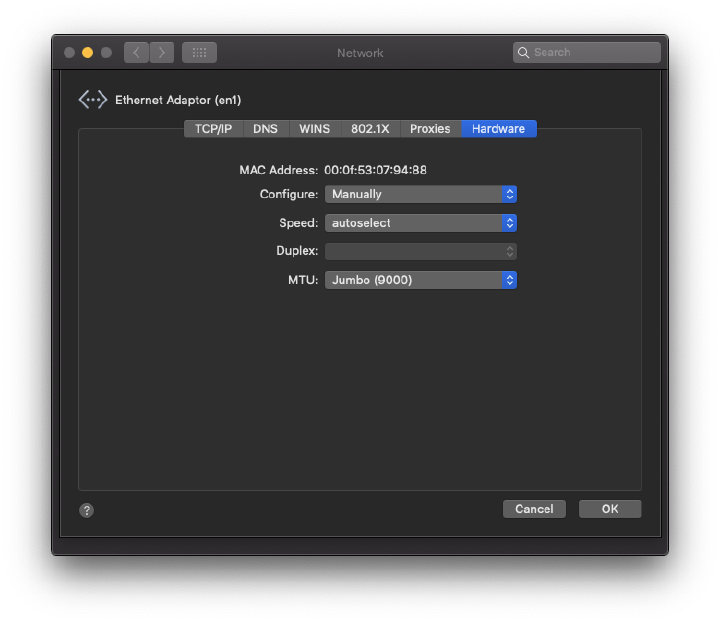
Make sure to select “Jumbo Frames (9000)” under “Hardware” here as well. Both sides need to have them enabled (or disabled).
Testing speed
Okay, time to do some benchmarks. Let’s break out iperf3.
- On Proxmox:
iperf3 -sto start the server - On the Ryzentosh:
iperf3 -c 172.16.0.20 -f g - Wait 10 seconds (for 11.2 GIGABYTES to be transferred)
# iperf3 -c 172.16.0.20 -f g
Connecting to host 172.16.0.20, port 5201
[  5] local 172.16.0.10 port 50113 connected to 172.16.0.20 port 5201
[ ID] Interval           Transfer     Bitrate
[  5]   0.00-1.00   sec  1.12 GBytes  9.63 Gbits/sec
[  5]   1.00-2.00   sec  1.12 GBytes  9.64 Gbits/sec
[  5]   2.00-3.00   sec  1.12 GBytes  9.63 Gbits/sec
[  5]   3.00-4.00   sec  1.12 GBytes  9.63 Gbits/sec
[  5]   4.00-5.00   sec  1.12 GBytes  9.64 Gbits/sec
[  5]   5.00-6.00   sec  1.12 GBytes  9.63 Gbits/sec
[  5]   6.00-7.00   sec  1.12 GBytes  9.63 Gbits/sec
[  5]   7.00-8.00   sec  1.12 GBytes  9.63 Gbits/sec
[  5]   8.00-9.00   sec  1.12 GBytes  9.64 Gbits/sec
[  5]   9.00-10.00  sec  1.12 GBytes  9.64 Gbits/sec
- - - - - - - - - - - - - - - - - - - - - - - - -
[ ID] Interval           Transfer     Bitrate
[  5]   0.00-10.00  sec  11.2 GBytes  9.64 Gbits/sec                  sender
[  5]   0.00-10.00  sec  11.2 GBytes  9.63 Gbits/sec                  receiver

iperf Done.
You can also adjust the output formatting to give you bitrates in GBytes/sec instead:
# iperf3 -c 172.16.0.20 -f Gbytes 1|2 ↵ 1005 18:50:53
Connecting to host 172.16.0.20, port 5201
[ 5] local 172.16.0.10 port 50155 connected to 172.16.0.20 port 5201
[ ID] Interval Transfer Bitrate
[ 5] 0.00-1.00 sec 1.12 GBytes 1.12 GBytes/sec
[ 5] 1.00-2.00 sec 1.12 GBytes 1.12 GBytes/sec
[ 5] 2.00-3.00 sec 1.12 GBytes 1.12 GBytes/sec
[ 5] 3.00-4.00 sec 1.12 GBytes 1.12 GBytes/sec
[ 5] 4.00-5.00 sec 1.12 GBytes 1.12 GBytes/sec
[ 5] 5.00-6.00 sec 1.12 GBytes 1.12 GBytes/sec
[ 5] 6.00-7.00 sec 1.12 GBytes 1.12 GBytes/sec
[ 5] 7.00-8.00 sec 1.12 GBytes 1.12 GBytes/sec
[ 5] 8.00-9.00 sec 1.12 GBytes 1.12 GBytes/sec
[ 5] 9.00-10.00 sec 1.12 GBytes 1.12 GBytes/sec
- - - - - - - - - - - - - - - - - - - - - - - - -
[ ID] Interval Transfer Bitrate
[ 5] 0.00-10.00 sec 11.2 GBytes 1.12 GBytes/sec sender
[ 5] 0.00-10.00 sec 11.2 GBytes 1.12 GBytes/sec receiver
That is 1.12GB or 1120MB per SECOND. Imaging that. That’s a bit more than a full CD of data. Heck, that’s about 1000 floppy disks per second. Okay, I’m claiming that. 1000fdps. :-)
Samba
I run Samba in a LXC container on Proxmox. There’s now only a few things to do for Samba to use that fat pipe of networking goodness.
First up, add another Network device. Pick another IP address in the private subnet and use the Linux Bridge you created earlier. You can add this in addition to the network device you probably already have for your old and slow gigabit LAN.
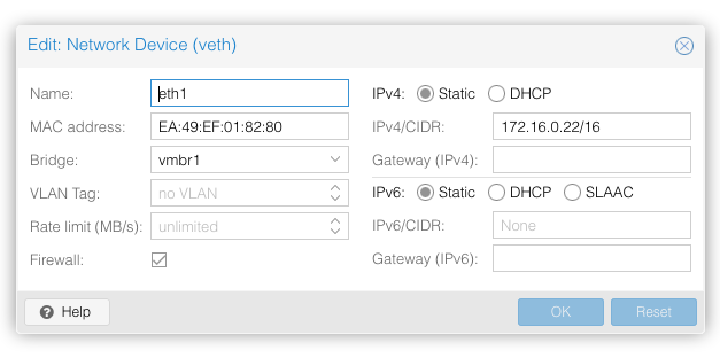
You may need to check /etc/network/interfaces. Proxmox probably updated it for you already, but it’s missing the MTU setting. So, just add it and restart networking (or you’re container, it’s fast anyway) ;-)
iface eth1 inet static
        address 172.16.0.22/16
        mtu 9000
If you did it all correctly you should see:
# ip link list
1: lo: <LOOPBACK,UP,LOWER_UP> mtu 65536 qdisc noqueue state UNKNOWN mode DEFAULT group default qlen 1000
    link/loopback 00:00:00:00:00:00 brd 00:00:00:00:00:00
2: eth0@if82: <BROADCAST,MULTICAST,UP,LOWER_UP> mtu 1500 qdisc noqueue state UP mode DEFAULT group default qlen 1000
    link/ether 8a:b3:db:74:b9:60 brd ff:ff:ff:ff:ff:ff link-netnsid 0
3: eth1@if86: <BROADCAST,MULTICAST,UP,LOWER_UP> mtu 9000 qdisc noqueue state UP mode DEFAULT group default qlen 1000
    link/ether ea:49:ef:01:82:80 brd ff:ff:ff:ff:ff:ff link-netnsid 0
Then you need to configure Samba to listen on both your gigabit and 10 gigabit interfaces. Check /etc/samba/smb.conf, there’s probably a comment in there
already about the interfaces flag. I simply added the following to enable both my interfaces.
interfaces = 172.16.0.22/16 10.0.2.245/16
Restart samba or reboot. And you’re good to go.
Accessing 10,000mbps Samba shares
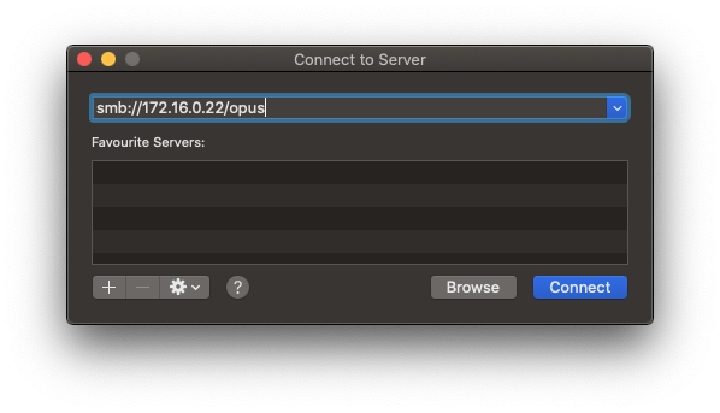
You have to routes to your NAS / Samba shares now. One over your old gigabit network and one over your fast 10gbps point-to-point connection. Samba can handle both, so it’s only a matter of accessing it correctly from macos.
Open Finder and press ⌘-K (or select Go -> Connect to Server…). Then you’ll need to enter the proper URL for your Samba share like so. Remember to use the IP for your container - not the IP for your Proxmox host.
That’s all
That’s all there is to it. Mount those shares and enjoy blistering fast transfer speeds. Your HDD’s are once again the bottleneck now.
No, I’m not upgrading to a full SSD ZFS pool…